Lee Willis

January 29, 2010
by Lee
40 Comments

Getting URL of Post Thumbnails in WordPress 2.9

One of the improvements in WordPress 2.9 is native support for thumbnail images on posts. The API is pretty good – although it assumes that you want to return the whole IMG tag. In my case I wanted to return the URL of the image (So I could wrap the actual thumbnail in a lightbox-style link to the larger versions).

So – if you want to get the URL of your posts thumbnail – here’s the code you need:

$image_id = get_post_thumbnail_id();
$image_url = wp_get_attachment_image_src($image_id,'large');
$image_url = $image_url[0];

I hope this helps you with your theme development.

October 17, 2009
by Lee
124 Comments

How to Split Test WordPress Themes

I recently re-worked a site for a client. He was moving over from Joomla to WordPress, so I started from scratch with his theme design. They liked the new theme I came up with – however I’d put the menu and other navigation (Links to recent articles, etc) in a right hand sidebar, and they weren’t too sure about that.

“Doesn’t everyone have the menu on the left?”

Now I’m no usability expert, and while I figured they were probably right I thought we’d run a little experiment. I trawled around a bit, and I found a nice little post by David Dellanave. While I was OK implementing David’s solution I though it was probably a little complicated for some of my other clients, especially when it came to running 3 Google analytics accounts – so I did some digging.

The result is the SES Split Testing plugin.

To use the plugin you’ll need to be using Google Analytics tracking on your WordPress blog already (If you’re not, then I’d recommend the “Google Analytics for WordPress” plugin), then :

  • Create two (or more) versions of your theme
  • Select them in the plugin settings
  • Define custom segments in Google Analytics
  • Sit back and watch the results roll in

Create theme variations

In most cases, you’ll want to test two versions of 1 theme with some slight changes. Let’s assume your theme is in the folder wp-content/themes/mytheme. Take a copy of your theme and put it in fresh folder, e.g. wp-content/themes/mytheme_2. Open up the style.css file in the second folder, and change the Theme Name, e.g.

/*
Theme Name: MyTheme
*/

to

/*
Theme Name: MyTheme (v2)
*/

Set up plugin settings

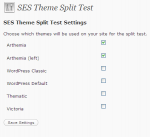
Wordpress Theme Split TestingNow you can drop the plugin into your plugin directory, activate it in the WordPress backend, and then go to the settings page (Settings->SES Theme Split Test). The plugin will list all of your available themes, and you can choose which ones you want to be part of the test.

Once you’ve saved the settings, the split testing will kick in. Visitors will be randomly assigned one of the chosen themes, and they’ll receive that theme any time they visit in the next 30 days. Not only that, but their visit will be tagged with a special variable that you can pick up on in Google Analytics.

Set up Custom Analytics Segments

Google Analytics lets you define custom segments (Ways of grouping customers). In this example we want to group customers according to which theme they were shown and then we can measure our chosen metric (Purchase / sign-up / page views – whatever) for the two groups and compare them. To get started, you probably want to wait 24 hours so that Google starts to receive the tagging data.

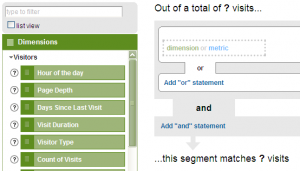
Setting up custom segmentsLog into your analytics account, and click on the “All Visits” dropdown (Top-right, just above the date selector), and then choose “Create a new advanced segment”. Then, you want to expand the “Visitors” dropdown under “Dimensions”

Custom Segment Build

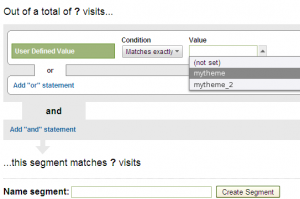
Scroll down until you find “User Defined Value” and drag it onto the right hand box that says “dimension or metric”. If Analytics has got your tagging data (See – I told you to leave it 24 hours!) then you’ll get to choose from the values being passed, e.g.

Analytics Custom Segments

Create a segment for each of your themes, and give them a meaningful name, then you’ll be able to select them as custom segments in your reports.

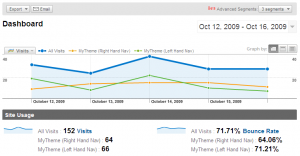
Segmented Analytics Reports

Now it’s just time to wait, see what happens, then decide. Once you’ve got a winner then just set that as your blog’s standard theme in the normal way, and either deactivate the plugin, or unselect the themes in the settings and users will see the blog default.

September 25, 2009
by Lee
0 comments

Google edges towards local hubs

Google has announced the launch of “Place Pages”. Essentially a local hub showing you relevant information from maps, search, business listings and so on.

It’s a fairly basic implementation right now (My local page doesn’t return any info just yet – not even businesses that I know are listed with Google) – but you can see that these could develop into fairly complex local hubs if Google feel that it helps relevance. Not to mention the potential for locally-targetted ads …

Is your place listed?

September 18, 2009
by Lee
1 Comment

A/B Testing Your Email Marketing

I’ve been working with a few clients to move their email marketing to a new home after most of them outgrew the limits of what they could reliably send through their existing infrastructure / hosts. Now – marketing isn’t really my strong point, and I’m definitely no designer – however I recommended and helped move over a number of campaigns to Campaign Monitor (The other key contenders appear to be MailChimp and Constant Contact).

Campaign Monitor appealed to me because of their clear, easy to understand website, and their fantastic interactive tool for creating mailings and because they generally seemed to be a good company.

Yesterday, they rolled out a new feature, conveniently coinciding with me sending a mailing out for one of my clients. A/B Testing is something I’ve done before with web content, but never with email campaigns, so I was intrigued to find out how it would work (I was dreading segmenting my mailing list and so on …)

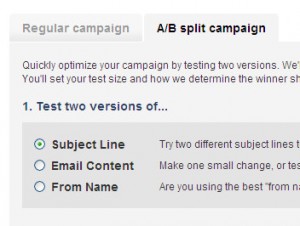
A/B Split Type

The good news is, that it’s really simple. You can choose to run different Subject lines, Email Content, or From addresses.

In my case, the functionality arrived a little late for me to create 2 designs (I’m not a designer, and even making basic changes tends to take me a while!), so I plumped for the Subject Line test.

I chose my two subject lines, picked the subscriber list it was to go to (In this case it was actually a fairly small list – around 45 recipients only) and moved to the next step.

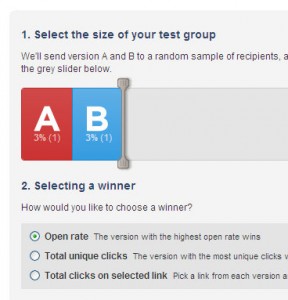
Next, I had to decide how I would pick my winner, and how many of my total list would constitute “the test”

Choosing a winner

Now here came my first problem – the default that campaign monitor chose for my “test” was just two recipients, one would receive option A, and one more would receive option B. The idea then is that based on the reaction (Which got opened more, which got the most clicks overall, which got the most clicks on a specific link) the winning version will go to the rest of the list. Now – even if I ran the test on the whole of the 45 recipients it probably wouldn’t be a statistically valid test. Certainly, I think Campaign monitor should have a higher “lower limit” on how many it suggests as the sample size.

Anyway – I upped the test size (I went for five recipients for each version which I agree isn’t ideal, but I was really just seeing how the functionality worked – this wasn’t a huge marketing exercise!)

Off the test went – I set it to run for 3 hours. There came my next problem. It became a bit apparent that I really should have chosen a bigger sample size in order to get a sensible response. Unfortunately by this stage “the test” is locked – you can’t extend it to more people – or extend the time before a winner is chosen.

I’m sure there’s probably some clear guidelines about why you shouldn’t do that sort of thing anyway (It probably invalidates the whole test, or makes hurricanes in Bolivia or something …), but it struck me that it wouldn’t have been nice to have done it anyway! I’ll certainly be using the feature on my next larger scale campaigns.

Note: MailChimp also appears to support split A/B testing of campaigns in a similar fashion – I couldn’t tell whether Constact does or doesn’t.

September 7, 2009
by Lee
3 Comments

How to write an application for WordPress

I’ve recently been doing some work for a family member on a WordPress blog they run, and the need came up to build a mini-app. Now historically, I’m a Joomla kind of guy, and it’s fairly clear that for a Joomla site you would build a component to implement your app.

However, in WordPress it’s a little different. I’ve found loads of articles about available API calls, manipulating “the loop” and all sorts of useful information. What I haven’t found though is something that explains at a fundamental level how I should approach the problem.

There isn’t a concept of an “application” under WordPress, the only items that are accessible are “posts” and “pages”. As far as I can tell, I have two options:

  1. Publish a post/page with no content other than a special string (E.g. [my-app]) and then write a plugin that filters post content and replaces the magic string with the output from the application
  2. Create a page, and assign it a custom template. Implement your application in that custom template

Option 1

It works, I know because this is what I did 🙂   However there is a performance penalty, your application code is called on every post, and so you have to take steps to make sure it doesn’t run unnecessarily. The other disadvantage is that well, it just doesn’t seem clean.

Option 2

This seems a little nicer, but doesn’t really fit with WordPress’ nice plugin installation architecture – as far as I can tell plugins can’t auto-install into the current theme directory, and custom templates can’t live anywhere else.

So, this leaves me a little confused – can anyone point me as to how I should have solved this problem – or does WordPress need to grow up a little and add “application” alongside posts and pages?

August 7, 2009
by Lee
2 Comments

Tracking Twitter Traffic Redux

I wrote a previous post about how you could hack the excellent Twitter Tools plugin from Alex King to add Google Analytics tracking variables to the URLs posted to twitter when you posted a new blog post.

I submitted the patch upstream, and Alex kindly pointed out that rather than bodging around in his code – you could achieve the same effect with a filter.

So, here it is. Simply download this file and save it in your wp-content/plugins directory. Activate the plugin in your WordPress backend (It will be listed as “Twitter Tools Tagger”) and away you go. Whenever the twitter-tools plugin tweets about one of your blog posts, the URL will be tagged with analytics tracking.

As an added bonus, version 2.0 of Alex’s plugin can also pump your URLs through the http://bit.ly/ URL shortening service so your URLs will be tagged, and shortened.

So, that’s nice.

August 7, 2009
by Lee
9 Comments

Custom Taxonomies In WordPress Plugins

Taxonomy Support

I wrote recently about building a brand directory using a fantastic feature of WordPress called “Taxonomies”. Now that that feature is live I’ve realised that a number of my favourite WordPress plugins simply don’t support taxonomies.

Among the casualities were Google XML Sitemaps, and the otherwise excellent Headspace2.

Now, the beauty of open source is that when you get an itch like this, you can go and scratch it. So, I whipped out my coding gloves and set to work.

The results are below:

Google XML Sitemaps

The patch below will ensure that the pages for all of your taxonomy terms are listed in your sitemap – helping Google find the pages quicker.

http://www.leewillis.co.uk/patches/google-sitemap-generator/include_taxonomies.txt

HeadSpace2

The patch below lets you add %%term_description%% so you can populate your META tags properly on your term pages – great for us and our product directory.

http://www.leewillis.co.uk/patches/taxonomy_support_for_headspace/patch_v2.diff

Both of these have been submitted to the plugin authors – so hopefully they’ll get included by default in a future release. If you find them useful – please add to the threads here:

Google XML Sitemaps

Headspace2

July 31, 2009
by Lee
46 Comments

Using WordPress taxonomies to create a product directory

Background

WordPress lets you categorise your posts according to “tag”, and “category”. Which is fine. However, for some time now WordPress has supported a concept called “Custom Taxonomies”. Which is a long winded way of saying “We’ll let you choose how your organise and present your posts – however you want”.

This isn’t something I’ve ever felt the need to use before (I’m happy enough with tags on this blog) – however having used them recently I’ve really begun to appreciate how powerful they are – and I’m amazed that more people don’t use them to create a more sensible structure to their WordPress sites.

That said, I’m a bit of a geek, who’s not averse to diving into code, and isn’t intimidated by a set of cryptic API documentation 🙂

The Business Case

So, what can taxonomies do for you?

The site I built this for is a resource all about baby slings, the different types, the different brands, and people’s experiences, of finding, choosing, and using them.

Tagging just seemed to create a big, hard-to-navigate tag cloud that didn’t create an easy way for people to find the right content on the site that was going to be useful to them (Feedback has suggested that people are either looking for information about a particular brand, or a specific type of sling irrespective of brand).

The How-To

So, out went the “tags” (We removed them from most old posts, don’t add them to new posts, and got rid of the “tag-cloud”). Next step was to install Joost de Valk’s Simple Taxonomies plugin. This is one of Joost’s simpler plugins. In general all it does is let you create a taxonomy, and manage the terms within that taxonomy.

Actually, as an aside – I suspect this is why custom taxonomies haven’t really taken off. Out-of-the-box you have to create code to set them up and use them for effective site navigation. If the functionality provided by Joost’s plugin was in WordPress core, and theme authors really started coding for this stuff, I’m sure it would fly, but I digress …

So, using the plugin, we created two taxonomies – “Brands”, and “Sling Types”.
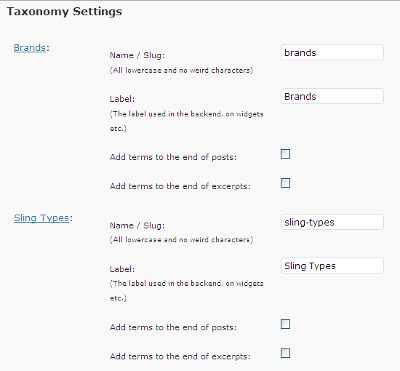
Taxonomy Settings

Next step was to go back through our posts (Fortunately this was in the early days of the site!), and correctly “tag” the posts against the right taxonomies. So on the SnugBaby review, we set the “Brands” to “SnugBaby”, and the “Sling Types” to “Mei Tai”.
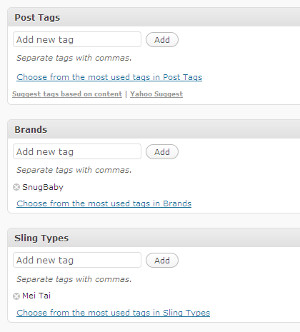
Tagging Taxonomies

Now we’ve got all of our posts beautifully organised, but we don’t have a way to view them. Before we get to that though, there’s just one more step. For every “term” (ie, for every brand, or sling type) we need to provide a description. Your new taxonomies can be found in the “Posts” section of the WordPress backend, simply click on the taxonomy, e.g. “Brands”, then work your way down the list adding a useful description.
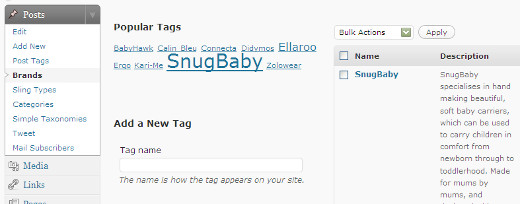
Taxonomy Descriptions

Now we can actually start presenting this information sensibly!

Theme Work

Now, we’re going to use that list of “terms”, and their descriptions, to create a top-level list of “brands”. Download the file below, and save it in your WordPress theme directory. We called it “brand-directory.php”, but the name doesn’t really matter.

brand-directory.php

This will create a new page template called “Brand Directory” (If you want to change the name, edit the comment at the top of the file).  Now create a page in WordPress, provide some content that you’d like to use as an introduction, and set the page template to this new file:
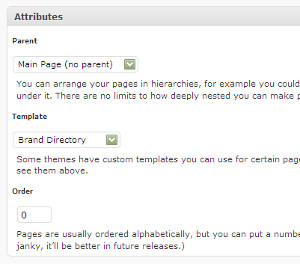
Set Page Template

Basically all this file does is display the page content you created:

<?php the_content(); ?></p>

followed by each one of the terms that you’ve used, along with it’s description:

$terms = get_terms(‘brands’);

foreach ($terms as $term) {

echo $term->description;

and a link to all of the posts that have been assigned to that term:

$wpq = array (‘taxonomy’=>’brands’, ‘term’=>$term->slug);
$query = new WP_Query ($wpq);
$article_count = $query->post_count;

if ($article_count) {
echo “<a class=\”taxonomy-rel-link clearfix\” href=\”/brands/”.$term->slug.”\”>”.$article_count;
} else {
echo “<span class=\”taxonomy-rel-link\”>$article_count”;
}

echo ” related article”;
if ($article_count!= 1) echo “s”; else echo  “”;
if ($article_count>0) {
echo ” – click to view</a>”;
} else {
echo “</span>”;
}
echo “<br />”;;

And there you have it, a dynamic data driven directory that keeps itself up to date whenever you “tag” a brand – all you have to do is add a description for the brand!

For an example see the “Get Your Hands Back!” brand directory here.
July 18, 2009
by Lee
1 Comment

10 Essential WordPress Plugins

I’ve been meaning to write this post for a while, but I’ve recently had to build a new WordPress site from scratch, and I’ve also had a couple of friends ask my advice on how to get their own sites up and running – so I was spurred into action.

This list is my ten “essential” plugins, that I think every wordpress site needs, and they all get installed straight away on any new site I build, so here they are in no particular order…

Akismet

Akismet checks your comments against an online web service to see if they look like spam or not – and if you ask me it does a great job. If your site gets in any way popular then you will need this plugin. It comes bundled with WordPress so there’s really no excuse for not enabling it.

Google Analytics for WordPress

A great plugin from the WordPress expert Joost de Valk – this allows you to easily add Google Analytics tracking code to your blog. You can download it here.

Google XML Sitemaps

This tool allows you to automatically create an XML sitemap suitable for submission to Google Webmaster Tools. An excellent opportunity to see how your site is being indexed and found by users.

HeadSpace2

Probably the most difficult to set up properly of the lot, Headspace2 describes itself as a “meta-data manager on steriods”. By default WordPress generates meta descriptions and keywords itself, but it often can’t do a great job (After all – you can probably summarise your article better than a computer – right?). Headspace2 lets you set sensible defaults for page titles, and meta-tags, and then offers you to override them for each post allowing you to put in meaningful descriptions, and keywords, and set SEO-friendly titles.

Robots Meta

This plugin offers an easy way for you to control your robot meta tags. For the uninitiated this means you can choose which of your archives (Date, Author, Category, Tags etc.) can be indexed by Google – allowing you to choose the scheme that makes most sense or your site navigation.

Secure WordPress

This is a fairly simple little plugin that takes care of hiding bits of information in the background of your site that might otherwise make your site easier to attack – and no one wants to deal with a hacked site do they! Get it here.

Sociable

Another simple plugin – it adds social bookmarking buttons to your post so that your readers can share your musings with their friends, colleagues, and the rest of the Internet too. It offers a great selection of social sites, so you’ll be sure to find a set that match your business.

Subscribe2

This plugin allows your readers to subcribe to updates via email – receiving an email every time there is a new post or page. This is an essential plugin if your audience is non-technical and wouldn’t know their RSS from their elbow …

Subscribe To Comments

If people comment on your posts, then they’re starting a dialogue – one that you’ll want to continue. This plugin lets people receive notifications when other comments are made against a post they’ve commented on. There are other options for this sort of functionality (Disqus, Intense Debate etc.) – but this is a good option that works well.

Twitter Tools

An excellent tool that lets you join up your twitter following with your blog, turning blog posts into automatic tweets, and letting you feature your tweets in the sidebar of your blog. You can get the plugin from here – although I’d also recommend checking out my previous post about how to track your twitter traffic so you can tag the tweets it produces with Google Analytics and you can see how effective it’s being.

Roundup

If you get all of these installed and set up you’ll have the basic of an SEO friendly blog which will allow your readers to interact with you how they want – now you just have to write engaging content!

June 29, 2009
by Lee
2 Comments

Google and Microformats – The end of the road for Froogle?

About six weeks ago, Google made an interesting announcement. They basically said that they will

Look for markup formats (microformats and RDFa) that you can easily add to your own web pages

This is an interesting announcement for a bunch of reasons (which I’ll get to soon – I promise!).

Now, I like Google, they build some fairly good stuff, and provide some quite good tools for webmasters. There’s a lot more that they could do I’m sure, however the tools they provide are a lot better than some people. So, I figure if they’re willing to put the effort in, then so should I.

Google helpfully have a bunch of support pages showing which microformats they support, and some immediately jumped out at me since I run a bunch of ecommerce sites – hproduct and hreview. Now, most of my sites don’t actually have reviews on them (Yes, I know – they increase conversion …), so I jumped straight to hproduct.

This supposedly lets you mark up your page so that the key attributes can be picked out easily. Perfect – I can mark up all of my products and have Google easily index them, jump straight to the top of the SERPS and retire a millionaire before I’m 35 …

Well, no actually. Google said:

Currently we recognize product data included in reviews.

Which reads to me like they don’t support it outside of reviews. I find this pretty confusing – especially when one of Google’s aims is to rid the index of “spammy review sites”.

So, I’ve marked up one of my sites with hproduct microformats just to see what happens.

At least I think I have…

You see, there’s no real way to check. I’ve yet to find a validation service (One thing that w3c did right all those years ago), and there’s no way to see if Google has found them and noticed them.

I do however have some observations about my implementation that hint at why I think the format doesn’t quite work (At least when taken alongside Google’s understandable strictness about showing their crawler the same as your users).

1. Categories

When people browse to a category they see the category name right at the top of the page, together with a category description, followed by a list of products.

The hproduct spec suggests that I should put the category inside every hproduct group. Which is fine on a technical level – but in terms of usability – why would I want to display it like that for my users?

display:none here we come …

2. Brand

In my particular case my products are categorised by brand, so I have the same problem here. The spec expects me to put the brand within the hproduct cluster – which means my user will see it 20-30 times on a page unneccesarily (They already know the brand – they chose the category). Not to mention the keyword-stuffiness of it all…

3. URL

Google’s example markup contains this little gem:

<span class="url">http://anvil.example.com</span>

So – let me get this straight. You want me to display a link to the product page, where the anchor text is the URL? Is this 1994 again?

Can’t I just do this and have you work it out?

<a class="url"
href="/shop/baby-carriers/ready-made-slings/black-and-contemporary-circles.html">
Nice User-friendly link text
</a>

So that’s my moans and gripes out of the way.

Now, I said there was something interesting about all this – and there is. You see, this is a major departure for Google. They’ve made it their business to make sense out of the myriad of unstructured data on the web – and they’re good at it – very good. There’s two problems I see with this proposal:

1. Why are Google abandoning their previous plan – has the spam and unstructuredness of the web got too much for them?

2. If everyone structures their data – that really lowers the barrier to entry for other search engines

And here’s a third because I’m feeling generous:

3. It’s easy to game. I said before I don’t have reviews on my site. That’s not to say I can’t now just whip up a quick <div class=”hreview-aggregate”> <span class=”average”>4.4</span></div> [Not that I would, but someone will]

The other reason I think this is interesting is that it pretty much changes the game for Froogle (Aka Google Base, Aka Google Product Search). That’s a service to allow you to provide structured data to have your products listed in Google … hmmmm.

I guess we’ll have to see where that goes – but with microformats for products, and universal blended search results I can’t see a reason to keep good ole Froogle much longer …