Lee Willis

August 26, 2010
by Lee
3 Comments

Post Thumbnails only for Custom Post Types

The guys over at getshopped.org are working on a pretty major revision to their WP e-Commerce plugin. Part of this is migrating “products” into custom post types, including using post thumbnails for the product images. One of the problems that has cropped up in testing was where user’s themes didn’t support post thumbnails. The first fix for was for the plugin to force “theme support” for post thumbnails by calling

add_theme_support( 'post-thumbnails' );

This worked, in that it solved the problem – all of the post-thumbnail function calls worked. However, it left a bug, and one that isn’t a software, or a techie bug – it was the worst kind – a bad user experience. Suddenly “posts” and “pages” would allow you to set featured images when authoring, or editing, but because the theme didn’t really support post thumbnails, those images would never show leaving a confused, bewildered user. So, the solution is to enable the support in general, but disable it for specific post types:

function check_thumbnail_support() {
 if (!current_theme_supports('post-thumbnails')) {
   add_theme_support( 'post-thumbnails' );
   add_action('init','remove_posttype_thumbnail_support');
 }
}
add_action('after_setup_theme','check_thumbnail_support',99);

function remove_posttype_thumbnail_support() {
 remove_post_type_support('post','thumbnail');
 remove_post_type_support('page','thumbnail');
}

This does three important things:
1. Check to see if the theme supports thumbnails already – if so, do nothing
2. If not, then turn on post thumbnail support, but also …
3. Remove support from “post” and “page”

The “gotcha” if you’re trying to come up with this yourself is that theme support is for “post-thumbnails”, but post_type_support is for the more generic “thumbnails”. Hope this comes in handy some someone.
June 23, 2010
by Lee
0 comments

WordCamp UK 2010

WordCamp UK is an informal annual gathering of WordPress publishers, designers and developers based in the United Kingdom.

This year’s event is being held in Manchester (Which is nice and central if you ask me!) and looks like it’ll be a great chance to chat about what’s new and groovy with WordPress, and find out who’s doing what in the UK.

You can find out more at the WordCamp UK site.

June 10, 2010
by Lee
0 comments

Extending Virtuemart the smart way

Someone left a comment on my article about Virtuemart Category Discounts the other day – that I though was worthy of a post of its own.

What James pointed out was that instead of amending core files, you can create “class overrides” to amend functionality you want to.

You can read James’ original comment, or skip straight to the article that explains everything!

My future Virtuemart customisations will definitely make use of this – thanks James!

June 9, 2010
by Lee
42 Comments

Reverse the product order in WP e-Commerce

While WP e-Commerce lets you choose how to order your products (E.g. Price, Name, Date Uploaded) through the admin area, it doesn’t let you control whether you’re sorting ascending or descending – e.g. cheapest first, or most expensive first.

Here’s a a quick tip to show how to control the sort order, just add the following snippet to your WordPress theme’s functions.php file:

<?php
    if (!isset($_SESSION['wpsc_product_order'])) {
        $_SESSION['wpsc_product_order'] = "DESC";
 }
 ?>

Just swap DESC for ASC to swap the default order. Happy sorting …

April 28, 2010
by Lee
11 Comments

Adding Virtuemart Product Images to your Sitemap

I wrote in a recent post about how to add post images into your sitemap based on WordPress post images. However I look after a couple of sites, and they’re not all WordPress. So I set off on a quest to add images to sitemaps on my Joomla! sites.

The good news is that my sitemap plugin of choice, Xmap, had recently added basic image support to their XML sitemaps. However, while Xmap can generate sitemaps for a wide variety of Joomla! components – the only one to have image support currently is the standard com_content extension. One of my main Joomla! sites though is a store based on Virtuemart, and I wanted to add product images to the sitemap.

The result is a revised version of the com_virtuemart extension for Xmap, and a small change to the Xmap XML output code.

To get things up and running there’s five simple steps:

  1. Make sure you’re running version 1.2.7 of Xmap
  2. Take backups of all of these files from your existing Joomla! installation:
    • components/com_xmap/xmap.xml.php
    • administrator/components/com_xmap/extensions/com_virtuemart.xml
    • administrator/components/com_xmap/extensions/com_virtuemart.php
  3. Download com_virtuemart.xml and com_virtuemart.php from here, and save them into administrator/components/com_xmap/extensions/
  4. Download xmap.xml.php from the same place, and save it into components/com_xmap/
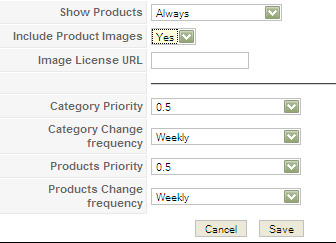
  5. Configure the com_virtuemart extension under com_xmap settings in your Joomla! administrator area. Make sure you’ve got images turned on, and a license URL specified if you want one.

That’s it – your sitemap should now include images for all of your products.

PS. The default Joomla! robots.txt bans Googlebot from crawling the Virtuemart image folders, you can allow them, by adding:

Allow: /components/com_virtuemart/shop_image/product/

to the bottom of your robots.txt …

April 21, 2010
by Lee
21 Comments

Joomla / Virtuemart Campaign Monitor Plugin

I’ve run a Joomla site, and a Campaign Monitor subscriber list for around 18 months. For most of that time I’ve manually exported subscribers from Joomla and imported them to Campaign Monitor. Finally I got fed up, and put together a simple Joomla to Campaign Monitor plugin.

The plugin auto-subscribes new users (Whether they register deliberately, or are created by other plugins – e.g. by purchasing from a Virtuemart store) to your chosen Campaign Monitor list.

To get up and running, follow these 4 simple steps:

  • Download the plugin
  • Install it
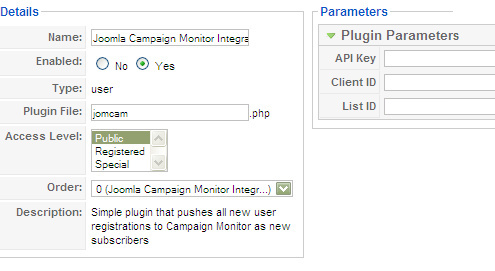
  • Set up your Campaign Monitor details in the configuration screen

    You can find a great guide for finding these IDs here
  • Activate the plugin

Obviously, you’ll want to make sure that you have the user’s permission to contact them as part of the registration policy.

Happy integrating.

April 17, 2010
by Lee
20 Comments

Adding Post Thumbnails To Your Sitemap

Google recently blogged about Adding Images to your Sitemaps. When I read this my thoughts jumped straight to a friend’s site that is image-orientated, and could really benefit from this. His site uses WordPress’ post thumbnails to store an image against each post, and I wanted to get those images into his sitemap.

His site already uses the great Google XML Sitemaps plugin to auto-generate an XML sitemap, so I thought I’d have a go at extending it to support post thumbnails.

The resulting XML looks a little like this:

<url>
  <loc>http://test.leewillis.co.uk/hello-world/</loc>
  <image:image>
    <image:loc>http://test.leewillis.co.uk/wp-content/uploads/test.jpg</image:loc>
    <image:title>Hello world!</image:title>
    <image:license>http://test.leewillis.co.uk/license/</image:license>
  </image:image>
  <lastmod>2010-04-14T21:15:15+00:00</lastmod>
  <changefreq>monthly</changefreq>
  <priority>1.0</priority>
</url>

Some notes on the above. The image title is set the same as the post’s title – which I figure should be a reasonable result, from a user and SEO point of view. The license URL is configurable (One per site).

I’ve submitted the code to the plugin author to hopefully get included, but if you can’t wait, there’s a patch file available here – just apply it with the “patch” utility.

April 9, 2010
by Lee
408 Comments

Region-based shipping with WP e-Commerce


I’ve been asked a few times about how to split up countries into regions and charge shipping differently to the different areas in WP E-Commerce. This was something that was almost, but not quite possible with one of my existing plugins.

Now it’s just a little bit easier.

What You’ll Need

In this example we’re going to show how to achieve the following:

  • Set of Weight rates for New Zealand (North Island)
  • Set of Weight rates for New Zealand (South Island)
  • Set of Weight rates for the rest of Asia/Pacific
  • Set of Weight rates for Europe

The Plan

To acheive our end goal we’re going to:

  1. Create 2 regions attached to the country “New Zealand”
  2. Remove New Zealand from the Asia and Pacific continent (So people ordering to NZ see those prices, not the general “Asia and Pacific” pricing
  3. Set up per-country/region rates for New Zealand
  4. Set up per-continent rates for Asia and Pacific, and Europe

Getting Started

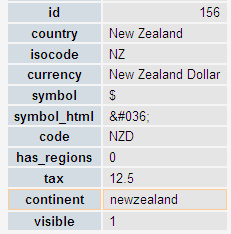
The first job is to find out the “country ID” for New Zealand. Using your favourite database you’ll want to look in the wp_wpsc_currency_list table for the entry for New Zealand, and make a note of the value of the “id” field – in our case 156.

While we’re here, we’ll also move New Zealand out of it’s current continent. This basically just involves updating the same record, and setting the continent field to something unique, e.g.

Next – you’ll need to create whatever regions you want in the wp_wpsc_region_tax table, using the ID you’ve just found as the “country_id” field, e.g.

Configuring your pricing

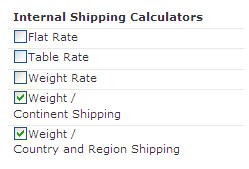
That’s all with the scary database stuff, now on to the easy stuff. First of all you’ll need to activate both of the shipping modules:

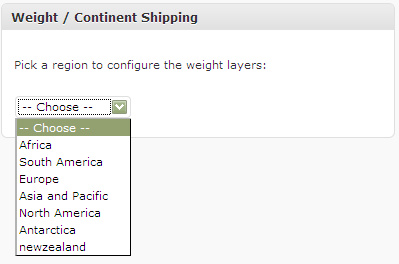
First up we’ll configure the continent-based pricing. Click on “Edit” next to the weight-continent pricing. Up will pop the configuration pane, with a drop-down of the standard continents – and also our “newzealand” continent – which we’re not going to use since New Zealand is going to be priced by region.

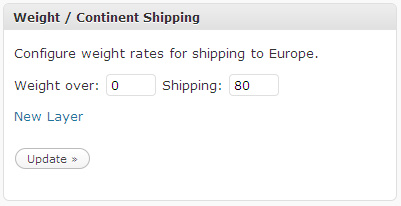
Let’s pick Europe, and configure some weight rates.

In this case we’ve just configured one weight band – which means that anything shipped to Europe will be charged at the same rate – £80 in this case.

We can do the same for Asia and Pacific, except maybe setting up multiple layers using the “Add Layer” link.

At this stage shipping will work for Europe, Asia and Pacific, but not for New Zealand (Since we took it out of Asia and Pacific).

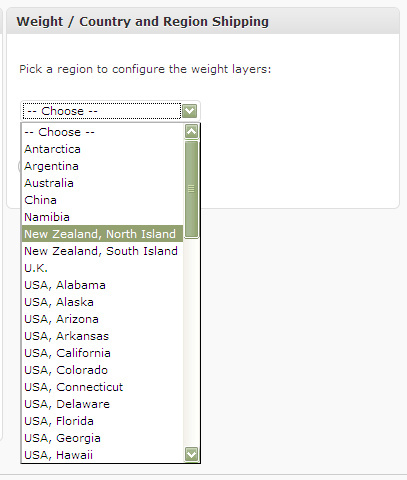
Click on “Edit” next to the Weight / Country and Region pricing. Up will pop the configuration pane, with a drop-down of the countries, including regions where configured – for example, we can see our North Island, and South Island regions here:

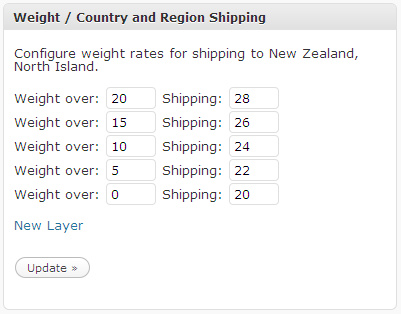
Selecting a region gives us the chance to configure weight rates, e.g.

Repeat for other regions, and you’re set. Happy Shipping!

Note: All weights should be set up in lbs, no matter what weight unit you used to set the weight for your products. WP e-Commerce will convert between them for you.

March 6, 2010
by Lee
0 comments

WordPress 2.9 e-Commerce

WordPress 2.9 E-Commerce WordPress 2.9 e-Commerce, has been published – the definitive guide to setting up an e-commerce site on your WordPress blog using the WP e-Commerce plugin, of which I’m a bit of a fan.

This book provides an easy to understand, step-by-step approach to installing, configuring, and using WP e-Commerce to run your online store. We will construct an example store in the book with enough information and flexibility to adapt the store to your specific needs.

This book is for you, if you are interested in using WordPress as the basis for a store that can sell physical items, downloads, or services. It is ideal for a sole proprietor or small business owner with only basic, in-house technical skills. Some prior knowledge of WordPress will help, but is not required. No knowledge of PHP is expected, but it will be helpful.

You can buy it from Amazon here.

Disclaimer: I’ve linked to Amazon using affiliate links, to help fund this blog.